Vacuum cleaners can be your best friend to get rid of all those little bits of dirt and other unwanted elements that make your house look unclean and unpleasant. In our day-to-day life, we deal with various kinds of problems. This problem can occur in our professional life or in our family life. Having to deal with an unclean house in times like this can be a real headache.
But there’s no need to worry much as Shark navigator lift away vacuums are here to get the job done for you. They are one of the best vacuums available in the market right now. But yes, to keep its performance on and going we need to clean its components properly.
In this article, I’m going to talk about how to take apart a shark navigator lift away so you won’t feel any kind of trouble regarding this matter whatsoever.
Read More: Shark Steam Mop Not Steaming
How to Take Apart Shark Navigator Lift Away
There are multiple steps you need to follow to open and clean up your shark vacuum properly. Those steps are as follows
Step 1: Taking out the base plate
If you want to reach the brush bar and brush motor you have to take out the base plate first. Otherwise, you won’t be able to reach there. Start the process by removing the screws. There are a total of eight screws.
One thing should be noted that two of these screws are located below the small front wheel and another two in between the big wheels. A special star-shaped security bit is required for the job. And once you remove all the screws successfully you’ll have easy access to the components inside.
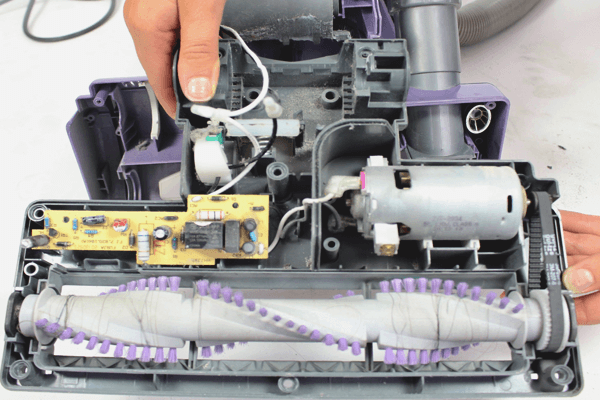
Step 2: Taking out the brush motor
Usually, the newer models have two additional screws on the side of the motor for safety. So first you need to take them out. But the older models don’t have this and you can easily live it out.
After that is done you’ll then need to remove the circuit board leads which are connected with motor contacts. Use needle-nose pliers to get this job done.
Step 3: Taking out the circuit board
Removing the circuit board is always a good idea if you are removing your brush motor anyway. Because sometimes, the circuit board can also be the reason behind your vacuum cleaner not functioning properly.
There’s also a handle engagement switch located on the side of the circuit board. This only activates the brushbar if the handle is in the right position.
Step 4: Taking apart the motor housing unit
A very easy and fast way to remove the pipe which kind of looks like an elbow is pulling it in your direction. Don’t be too harsh on it. Just pull it out gently and it’ll come out very easily.
Step 5: Taking out the latches from the side
If you reached this far without facing any great trouble. The next step of this process is to move the latches from the sides. This process is also not that hard to complete and you can do it very easily. But before that first, you need to get rid of the HEPA filter and the cover in front.
After that, you need to lay down your motor housing and push the dowel pins. These pins hold the latches in their place. To get rid of these pins you need to apply a specific amount of pressure alongside a center hole punch. But this pressure is not so much that you need to use a hammer to get the job done.
Step 6: Take out all the screws from the motor housing
Remove all the screws which can be found in the front plate. A very good point to be noted here is that a screw stays hidden behind the sticker which contains the words “loss of suction”. So you need to take that out too. So all in all there should be six screws that you need to take out. Also, some screws can be found on the back of the handle holder, remove them too.
Step 7: Remove the screws located on the bottom side
To remove the motor from the housing you need to remove all the screws from the base. If all the screws are in their place you should find 10 screws in total. Don’t be impatient. Slowly remove all the screws one by one and your motor should come out just fine without facing any sort of trouble.
Top tips before you start the process
If you are taking apart your Shark navigator lift away for the first time then it might look like an enormous task for you multiple things needed to be kept in mind. So, videotaping yourself is always a good idea while you are completing the process. If you forget any step you can always look back to the tape and figure out how you did it the first time around.
Also, follow the instructions given in this article properly and you shouldn’t face much trouble.
More on LivingProofMag
Bissell Crosswave vs Hoover Floormate
Best Wet and Dry Vacuum Cleaner for Home
Are Dyson Vacuums Worth It?
How to Clean Nozzle on Shark Steam Mop
FAQs
How to clean my Shark navigator lift away
You should always keep your Shark navigator lift away clean to function properly. Emptying the dust cup after cleaning and disassembling the brush motor and HEPA filters after every month or two is also advised.
How to clean HEPA filter on Shark lift away
Cleaning the HEPA filter is a really easy process. Just pull it out slowly towards you and it’ll come out. Keep the dirty side on the bottom and clean away all the dust with a brush.
Can you wash Shark lift away filters
Yes, it is recommended to clean the filters every month. The more you keep your machine clean the more it’ll run smoothly.
Conclusion
All of us want to have a neat and clean house. But sometimes it’s not possible if there’s a heavy sandstorm or just some random gathering of friends in your house. Justice is a part of our day-to-day life and we need to get rid of them almost every single day. A Shark navigator lift away vacuum is one of the best to get this job done for you. And if you go through this article thoroughly you’ll find all the answers you need on how to take apart your Shark vacuum and clean it properly so that it runs smoothly without any trouble for a long long time.