For holding up the correct mechanism of your toilet, you must have adjusted your toilet float. This device will help to fill the tank without any overflowing.
Moreover, a leaky and faulty toilet tank wastes 6,000 gallons of water per month. Any flush on the toilet float can also interrupt the smooth flushing.
Avoid all this wastage of your money and water by fixing this soon. But do you know how to adjust the toilet float?
Fortunately, it will take a few minutes and some tools to solve this issue. You might hire some professionals for the task. But why should you waste money when it is too easy to fix.
Get prepared to Adjust a Toilet Float
Experiencing some leakage and slow flushing issues doesn’t mean that you should instantly adjust the floating. Firstly, you have to know what tools you will need and analyze the real problem.
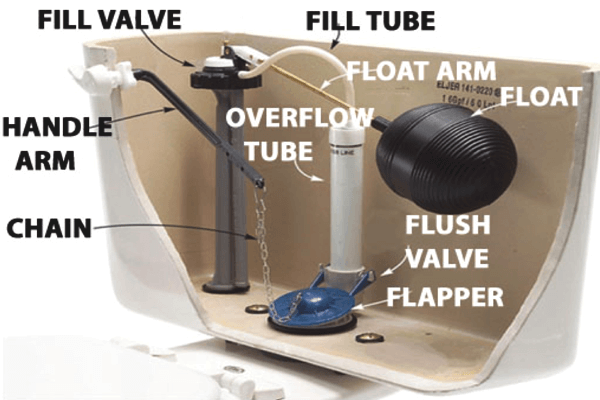
Sometimes you’ll only need a screwdriver to adjust the float. But the exact requirement and step will depend on the type of your toilet float. So, it would help if you determined what the toilet float type is. Usually, there are two different types of toilet floats. One is a ball float, and the other one is a cylinder toilet float.
The old and previous designs of toilets hold the ball and arm toilet float. And the modern toilet generally has this cylinder toilet float.
The ball and arm toilet float are being used for years. If your home is old and rough, you must have this one. This type of float is shaped like a small ball. You’ll find it attached to the toilet fill valve through a long rod. Any issue in this toilet float will make the water volume running below the water.
If the toilet float is modern, it will look like small rectangular shapes. Whenever you flush the toilet, it moves upwards and downwards with a vertical pipe. Here you’ll get a metal spring clip controlling the system instead of a metal rod.
For making the procedure safe and mess-free, you need to gather some other materials too.
How to Adjust Ball Type Toilet Float?
Ball and Arm type toilet float fixes are easy and instant with proper procedure. You only need to follow some steps:
- Firstly, check the toilet tank water level carefully. It should always be around 1/2 inches under the overflow tube of your toilet float. If you notice the water level more or less than this , it’ll be indicated as faulty. For proper and clear instructions, some water tanks also have these marks over their body.
- Make sure you’re detaching the water supply. It’s important that the tank is entirely empty. This is important for adjusting the toilet float. How one should turn off the water supply will depend on the tank type. Some tanks might just need to turn the system off. Others might need to rotate the tank knob in a clockwise direction to stop the water supply inside the tank.
- Now you should use a screwdriver and unscrew this to adjust the ball of your toilet float. Keep turning the screw till the water stops running. Also, the ball floating will determine the water level. You need to check if it has any extra water left. For that, shake the ball gently and check the existing water. If the ball is somehow faulty or broken, just change it soon.
- You also have to make sure that the height of the floating ball is balanced. Get a screwdriver to adjust the height. Your clockwise and counter wise rotation will help you to fix the float.
- Once you’re done with the adjustment, turn the water supply on. It will take around 2 minutes to fill.
These are the easy and quick steps to adjust toilet float. If you notice any imbalance after filing the water, you have to fix this again.
How to Adjust Cylinder Type Toilet Float?
The modern toilet with a cylinder float is easier to adjust. It has a simple adjustment screw to fix the balance of the toilet float. Just follow these steps:
- Firstly, check the water level in your tank. Here also, it should be 1/ 2 inches below the water level and fill valve.
- If you see an imbalanced water level, start by turning off the water supply in the tank. The tank should be completely empty.
- Now you need to find the adjustment stem of the tank. It should be a long but tiny tube connected with the toilet tank valve. This part of the float helps to take the water level upper and lower side.
- Now, find your toilet float release clip. You have to press the clip to fix the toilet float. Grasp the dial tightly with the fingers to turn the process easy. Make sure you’re placing the cylinder float by half an inch. Keep rotating the stem in counter wise or clock system to adjust the height.
- Finally, you can turn the water supply on. It will help to confirm if the float is perfectly adjusted or not. Give the tank about 2 minutes to fill it full. Then, press the float wrench and flush it. You should check if the refill level is imbalanced or not.
Once you’ve done all the steps, your toilet float will get adjusted. Suppose the toilet level seems imbalanced than the determined water level. In that case, you might have to repeat the adjusting process again.
Frequently Asked Questions
Is it easy to replace a toilet fill valve?
Luckily, yes, the toilet fill valve fixing is easy. You don’t have to be any professional for this. You can just follow the instructions to fix it.
Can a toilet float ruin?
Yes, a toilet float can get ruined for many reasons. You’ll either notice an excessive amount of water running or faulty flushing.
Conclusion
A faulty toilet flow will flush your money with water. You can’t even think how much wastage it can make in an entire year. Besides, imbalanced toilet floats can happen to any toilet. This is not that tough to fix if you give some time and effort. There might be different types of toilet valves and toilet floats. But the fixing procedure of all is nearly the same. So, learning how to adjust toilet floats is a smart choice to grab.