A veneer is a slender wood layer that is glued on the surface of the wooden furniture. As it is the topmost strata of the fitments, it is obvious that it will be exposed to humidity, mechanical trauma, extreme temperature, etc., and get damaged as time passes.
Lifting, breaking, cracking, blisters of the veneer are the most common problems that people face with the veneer. If you wonder how to fix a veneer that is lifting, or broken, you will be benefited from this article.
It is normal for veneer-finished furniture to be damaged. In the case of old furniture, often the attachment glue becomes dry and results in blisters, lifts off of the veneer. You can fix the issue of how to fix veneer that is lifting by following some simple steps without any difficulties.
How to Repair Veneer That is Lifting
One of the most common issues of old furniture is damaged veneer. If you can restore it properly, it will last long as well as look like a new one. When the bubbling of the veneer or the edges start lifting off from the surface, they can be flattened by gluing if the veneer is not damaged. Here I am going to describe the process in detail, therefore, you can flatten the lifting corners of drawer fronts, tabletops, or cabinets easily.
Step 1
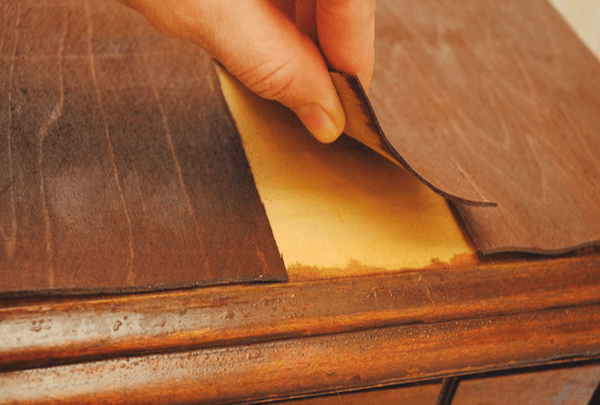
At the very beginning, you need to find out the extent of the damage. If the veneer is ductile or easily splintered, it may not be possible to repair the veneer. Veneers usually have a thickness between 1/28th to 1/42nd of an inch which is really thin and delicate.
To avoid further damage, you should take some precautions. To make the veneer pliable, you can force moisture into it so that the veneer does not get cracked or split. Simply put a damp cloth on the damaged veneer and heat it through a hot iron machine. Move it around for some time and wait for the veneer to be flexible and damp.
Step 2
Lift the loose end of the popped veneer carefully with a spatula. Scrape off the dust of the dried glue from underneath the base surface and the backside of the veneer. Use a sharp knife, file, or fine-grit sandpaper to remove the dried glue residue to clean the bonding surface properly.
Now you need to blow the dust off or use a compressed air canister which is used for cleaning the computer keyboard.
Wipe both surfaces with another damp soft cloth which is dipped in spirits. Make sure to remove the dust from the space in between the table and veneer, don’t blow the residue deeper to the undamaged site.
Step 3
Re-glue a thin layer of laminate glue or carpenters glue using a palette knife or brush to both surfaces of the table and veneer and let them dry a little bit according to the timeframe of the manufacturer’s suggestion. Glues will allow repositioning as they set slowly. But, if you use contact cement, you don’t need to wait as it bonds immediately, and so it should be applied without any error.
Glue and Glue Injection Syringe:
You should use good quality wood glue, like Elmers, Gorilla, or Titebond glue. If you enjoy using extra, fancy tools you can go for a glue injection syringe. It will help you to apply glue to the deep crack or awkward spots. All you need to do is fill the syringe barrel with glue and squeeze it into space. If you clean it thoroughly after every use, it will last for a really long time.
Step 4
Press down the loose, popped-up veneer carefully and smoothly into place from the side that is attached with the table to the edge of the lifted veneer. You can use a rolling pin or laminate roller for this purpose but be careful as it may scratch the surface. Wipe the excess glue off from the edges with a cloth dampened with warm water. You may feel that the glue has dried, but don’t worry, it will stick to the surfaces properly.
Step 5
You will need a wax paper sheet to cover the whole glued area. The shiny side of the wax paper should face down. The paper should extend at least 1 inch from the glued section as the excess glue may exude. Now clamp down the veneer in between the pieces of wood by using a C-clamp. To hold down the veneer firmly, use an additional clamp on the wood and leave it for 1-2 days. After that, discard the clamps, rub off the extra glue using a wet cloth. Lastly, you need to wax and polish the whole veneer surface.
Once the veneer gets dry, it will become smooth, firm, flat, and nice again.
Can I use wood filler instead of gluing?
Sometimes small pieces of veneer can chip while sanding. If you can find the chipped piece of veneer, you can glue it again. If you don’t have it, you can simply use a wood filler and replace the chip with it, it’s up to you. But if the size of the chipped piece is larger, filling it with wood filler won’t be a good idea.
How can I repair a cracked veneer?
The cracked or broken veneer also can be re-glued. If a large area of a veneer is cracked, it is comparatively easier to break off from the cracking site and glue it. You need to clean the surfaces before gluing and fit the edges to match the gaps. Apply a thin layer of glue on the wood base and set the cracked veneer with it. Before you press the veneer down, do not forget to match both the edges.
What are blisters?
The bubbled areas that are on veneer, produced by setting on the table or furniture something hot with a veneer finish, are known as blisters. Small blisters can be repaired with heat, but the larger ones need to be cut and glued to the base wood.
More on livingProofMag
How to Clean Grime off Wood Furniture?
Best Wood Furniture Cleaner
Best Electric Mops
Conclusion
If you’ve come to this point, you already know how to fix a veneer that is lifting, chipped, or broken with a few tools and some woodworking knowledge. When you notice the veneer is lifting, you should repair it as early as possible to prevent further damage. This easy method will help you to fix the old furniture and also give it a new look so you don’t need to replace them.