It is almost everyone’s dream to have a swimming pool for the summer season in the backyard of their house. And having a flat, solid pool foundation makes everything easier for you. The longer your pool lasts, the flatter and more robust the foundation needs to be. If the pool foundation isn’t level, your pool liner will tear, crack, and come apart over time.
Are you aware that you can do the task without having to dig? Yes, you certainly can! It is a far more convenient and cost-effective method of leveling your pool. Everyone understands how critical it is to correctly construct or level an above-ground pool and maintain it consistently, regardless of cost.
What You’ve Been Missing
Free Chlorine Vs Total Chlorine
Best Above Ground Swimming Pool Vacuum
Best vacuum for intex above ground pool
How To Level Ground For Pool Without Digging
Tools Needed For Leveling
Here is a complete list of tools you’ll need to level the ground of the pool without digging.
- Shovel
- Rake
- Wheelbarrow
- 2″ x 4″ planks
- 1″ x 6″ plank
- A 2-inch square wooden stake
- Tape measure
- Sand
- Tamper
- Water
- Metal Stake
- Sod cutter
- Hammer
- 4-inch nail
- Crushed limestone
Steps To Follow Before Leveling
Before beginning to level the ground, there is some preliminary stuff that you need to get out of the way. Fret not. It’s not so complicated. We have a suitable setup for you right here!
Step 1: Find a perfect location
It’s pretty impossible to move a pool once it’s been put up without emptying it and fully disassembling it. So pick the appropriate area before you begin.
Locate a suitable location for the pool installation. Make sure there are no utility lines beneath the surface. We will suggest you choose the flattest spot in your backyard.
Step 2: Clean that spot
If there are any plants in the area, you must remove them. In the place where you’ll put your pool, the earth must be barren. You won’t be able to level grass-covered ground.
The simplest method is to place a tarp over the area where you wish to put your pool. The tarp will kill the grass, making it easier to clear the area. You can also cut or relocate the trees using a sod cutter.
Step 3: Inspect the area
A thorough examination of the area is possible. This assessment should search for any noticeably unequal regions. It can be done with or without the use of specific equipment.
It’s better to employ technology that can detect places that aren’t visible to the naked eye. Lower-level areas should be filled in to match the higher-level regions.
Step 4: Test the area with a plank
After that, you can use a plank to check for evenness in the area. You can simply build up the lower parts instead of digging away the higher ones as you wish not to dig.
Step 5: Correct the unevenness
It’s time to perform some shoveling if there are any uneven areas. Move any large mud heaps, stones, or boulders from the spot. Depending on the size of the tree stump, it should be dug up or ground down.
Step 6: Water and temper the ground
To guarantee optimal compactness, the ground should be raked, moistened, and then rolled. The soil should be hard, taut, and level as much as possible. Tamping can aid in ensuring that the ground is in good enough shape to support the weight and strain of your new pool.
Leveling The Ground Step By Step
Now let’s move on to the big stuff – actually leveling the pool. Although the process is quite laborious and highly time-consuming, it’s still worth it in the end. So, follow these steps till the end to get a perfect pool foundation.
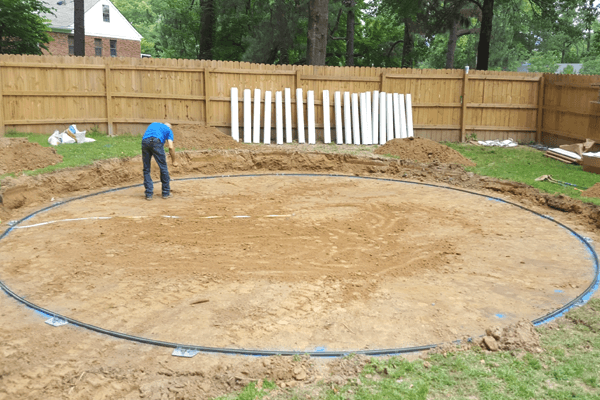
Step 1:Draw the perimeter of the pool
First of all, you have to draw a basic outline after marking the center of the pool. The rope should be measured to equal the radius of the pool plus 6 inches. Make a ring with a rope by drawing a line using spray paint and walking in a large circle while holding the rope tight. This circle on the ground is the pattern of your pool.
Step 2: Measure the Difference Between the Shallow End and Deep End of Your Pool
You’ll need to determine how unlevel the ground is where your pool will be installed. To do so, you’ll need to screw two 2′′ x 4′′ boards lengthwise together. Consider how you would shut a hotdog bun; your panels should be screwed together similarly.
Step 3: Pour Sand for leveling
A lot of sand is required after the board has been placed on the ground. The sand acts as a base preserving your pool’s liner.
Create a 2-inch thick layer of sand across the entire area of your pool site; however, if you end up with 6-inches or more, that’s fine as well. Spread the sand evenly with a rake, then moisten it thoroughly before allowing it to dry. It’d flatten and dry it out overnight.
Step 4: Compact The Sand Down Hard
The sand must be compacted into a substantial pool foundation. A lawn roller is the finest tool for the job, and you can rent one from most garden centers. Go over your pool’s entire base and pack it down flat.
Step 5: Level the Rest of Your Pool’s Radius
You must now locate the pool’s lowest spot once more. Pivot the plank around the space to begin the leveling operation. The whole area must be brought down to the same level as the lowest point. When your board pivots without getting trapped, you know its level.
It’s crucial to remember that you shouldn’t use soil when leveling. The weight of your pool is too much for the soil to bear. The ground will eventually become unlevel.
Step 6: Add Limestone for Extra Support
Crushed limestone can be spread over the area where your pool will be installed. Crushed limestone should be strewn about your workspace. After that, dampen it and tamp it down with your tamper. Make sure your limestone is flush with the sand base.
After the limestone has hardened, you can cover it with dirt and more limestone. Make sure it’s level with your foundation.
Step 7: Lay The Base Protector
You should start by laying down your base layer. You can also buy a specialist pool pad, which is often a huge foam or tarp base that fits under your above-ground pool as an additional layer of protection for the vinyl.
And then, the ground is ready to install the pool.
Other Options to Level Pool Ground Without Digging
Here are some alternatives to the process we described earlier. Move on to these only if you find it too necessary. Otherwise, the traditional approach will suffice.
Concrete Slab or Pad
Concrete may readily be used to create a smooth and level surface. Additionally, the rough texture of concrete ensures that your above-ground pool remains in place while in use. Remember that a layer between the concrete and the pool will be needed to prevent abrasions and pool leaks.
Installing Solid Foam
A flat surface for an above-ground pool can be achieved by placing foam directly on the grass. These foams are typically constructed of polystyrene or polyurethane and come in a variety of thicknesses.
Using Crushed Stones
In leveling the ground beneath a swimming pool, crushed stone is sometimes preferred over sand. It’s a lot more convenient to use. Plus, it decreases the chance of critters. But crushed stone must be correctly installed to avoid tears in your pool’s exterior.
Final Words
An above-ground pool will be hefty. The vast volume of water that goes into it accounts for the majority of the weight. It’s also not composed of concrete or hardened steel, so it’s not as sturdy or long-lasting as you might think.
So the leveling of the pool has to be strong enough. Otherwise, your pool will fall apart in no time. Hope this article was helpful to let you know how to level ground for pool without digging. Now you can install your above-ground pool without digging.