In modern days, water bills are rising steadily. A running toilet will cause you more havoc than anything else. Moreover, it’s ecologically a considerable wastage of water which is extremely bad for our nature.
On top of that, you’ll be able to hear a disturbing sound whenever there’s silence. The running toilet is going to be inconvenient if you don’t opt for replacing it. Especially without a ball float, many people tend to freak out.
However, we’ve prepared this article, especially for you, to remain at ease while replacing your flush issues. Hence, without any further ado, let’s begin!
Fixing a Running Toilet without a Ball Float
Step 1: Study Your Valve
In the past, this particular technique did not fail. Mostly, the difference between the modern toilet and the tanks that were introduced in the early ages is the ball that remains a float.
However, it can be easily installed in any compact cistern because it is smaller than a ball.
Usually, the filling valve is mounted on the cistern. This is more efficient than a ball valve and prevents the tank from being filled. They, however, come with a range of flotation aids that better perform the task.
A cup float is therefore integrated into the toilet through cheaper flushing. The level of pressure is right for the float.
A flush cistern is cheaper and softer because it uses a flow control needle in contrast to a small bathroom ball valve which sounds like a faucet in a small space. If you have double flush problems, keep reading to find the solution.
Now you know that this filler valve controls our tank water levels. Sadly, if your fill valve does not work as it should and replacement is the best way to fix a working toilet without a float.
Our next steps will help you to follow the best way to replace the Valve.
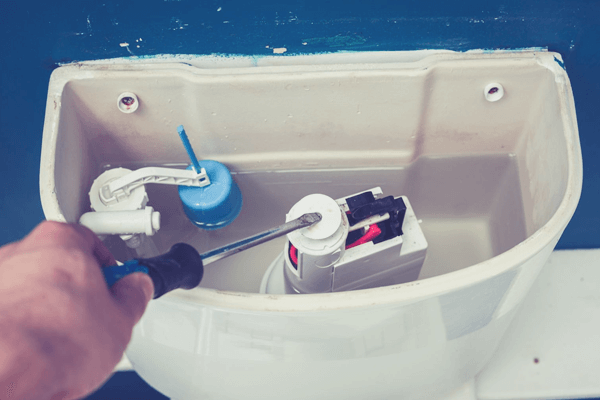
STEP 2: Replace the Valve
Next up, we’ll get rid of the Valve and have a new one installed. This is particularly apparent when it stops working correctly because of damage or when it seems not to stop. Plumbers suggest that every five to six years, you replace your fill valve to reduce unnecessary interruptions and keep flushing steadily.
In a local hardware store or Amazon, a new valve assembly is easily found. Be sure to include your good repair kit with a refill tube, a gasket, and a lock.
To remove the fill valve, a tractable wrench and a water container are required. Let the water supply valve turn off first, and then give the tank a thorough flush as a security precaution. We’re back in business now.
STEP 3: Break the Old Valve Base
Examine your old Valve thoroughly. If the damage to the base is insignificant, then that’s beneficial to you as a replacement will be simple. You’ll be able to reach the Fill Valve’s base to pull up the tube. If it’s hardened, you may want to use a hammer or a screwdriver to unscrew it.
STEP 4: Position the New Valve
The new Valve is now absolutely ready to be positioned. You may have seen a valve base before. The new one should also have a similar foundation. But you’re not going to need it as we already have the existing valve base that we had before.
All you need to do with your new Valve is just push it down to the existing base of your tank. Now, all you’ll need to do is lock the valve ring. The lock should be secured for attaching the replacement tube to the overflow tube.
We must remember at this stage to adjust the water level accordingly so that it isn’t set too high. This prevents the toilet from being filled without a floating ball and tank.
STEP 5: Ensure If It’s Working
Make sure to give a final touch of yourself. Start the main faucet and check if the flush is working as required or not.
There’s a very slight chance of the process going haywire. This method allows you to easily adjust the ball less toilet float if your old fill valve base is in excellent and usable condition.
Everything is excellent, but what if, even after the whole replacement operation, your Fill Valve base is not suitable for further use?
Well, the entire unit must be removed and therefore replaced. But that’s not more difficult than the previous task.
In the next step, we’ll discuss how you can do a complete replacement. Some essential tools mentioned previously will be needed in this particular step.
Change the Valves Completely (Optional)
Ensure to empty out your bathroom tank. It’s going to be best if you place the small bin or container under the water supply pitch so that the water flows into the bin/container placed.
This is an essential step as more than a few drops of water will flow.
Put your hand on the tank base to unplug the tube and use an adjustable wrench to remove the screw as needed.
And that’s that! That’s that! Now you can remove the whole assembly and throw it into the waste immediately. You can now easily install the new unit by adjusting its height according to the tank height and overflow tube.
So it is always possible to fix the toilet running without a float ball or a toilet cistern. After flushing, you won’t have to worry about it still running.
More on LivingProofMag
How to Fix a Kohler Toilet That Keeps Running?
7 Reasons Why Your Toilet Smells Even After Cleaning
Jacuzzi Dual Flush Toilet Keeps Running
Conclusion
You can quickly fix a running toilet without a ball float by the steps we’ve elaborated. Make sure to get the tools and valves of the best quality. Because, at the end of the day, the better quality valves you’ll get- the more they’ll serve you.
Make sure to change your valves routinely. If you see any sign of cracks or deformity in your tank or the toilet itself, make sure to get it checked by a professional as it could be a much more significant problem.
Hence, we hope now you know everything there is to know about fixing a running toilet without a ball float. Till the next time, happy flushing!